
The fundus camera works by directing light through the pupil, illuminating the retina, and capturing the reflected light with an optical imaging system and digital sensor. The images generated can visualize important structures of the fundus, including the optic disc, macula, retinal vessels, and surrounding tissues. Understanding this process helps ophthalmologists select the appropriate retinal imaging equipment for clinical use.
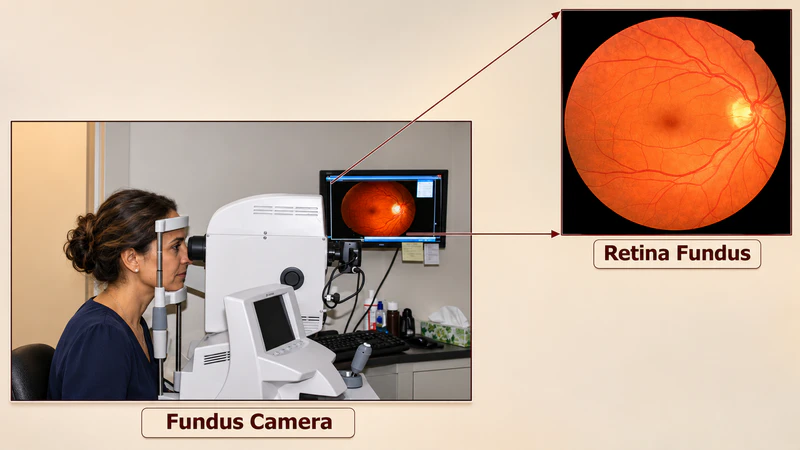
What Is a Fundus Camera?
A fundus camera, also known as a retinal camera, is an ophthalmic diagnostic device designed to photograph the interior surface of the eye. Unlike a standard digital camera, it must capture detailed images through the pupil, which is a relatively narrow opening.
The fundus refers to the back portion of the eye, mainly including:
- Retina: The light-sensitive tissue responsible for converting light into neural signals.
- Optic disc: The point where the optic nerve connects to the retina.
- Macula: The central retinal area responsible for detailed vision.
- Retinal blood vessels: Vessels that supply oxygen and nutrients to retinal tissue.
According to the American Academy of Ophthalmology (AAO), fundus photography helps eye doctors identify, monitor, and manage various eye diseases.
For hospitals and ophthalmology clinics, a fundus camera is particularly useful because it provides a permanent visual record of retinal conditions. Doctors can compare images taken at different visits instead of relying entirely on memory or written examination notes.
How Does a Fundus Camera Work? Understanding Principle
A fundus camera works like a specialized, low-power microscope attached to a high-resolution camera to capture detailed 2D images of the back of the eye (the retina, optic disc, macula, and retinal blood vessels).
The Optical & Working Principle
The core challenge of photographing the retina is that light must enter and exit through the exact same tiny opening—the pupil—without blinding or reflecting off the cornea and obscuring the image.
- The Dual/Coaxial Path (“Pupil-Sharing”): The illumination system and the imaging system share a common optical path. Light from a flash lamp or LED passes through a series of filters and lenses.
- The “Doughnut” Light Pattern: A special mirror/mask shapes the illuminating light beam into a ring or doughnut shape. This ring of light enters the outer edges of the pupil, illuminating the retina inside the eye while avoiding the very center of the cornea.
- Exiting Through the Center: Light that bounces off the illuminated retina then travels straight back out through the un-illuminated center hole (central aperture) of that same doughnut light pattern.
- Capturing the Image: This returning light passes through a central mirror aperture, through a series of focusing and astigmatism-correcting lenses, and onto a digital sensor (CCD/CMOS) or DSLR/video sensor to record the image.
What Are the Main Components of a Fundus Camera?
A modern fundus camera combines optical, electronic, mechanical, and software systems. Each component contributes to image quality and examination efficiency.
| Component | Main Function |
|---|---|
| Illumination system | Provides light for retinal observation and photography |
| Objective lens | Collects returning light from the retina |
| Optical mirrors and filters | Direct light and reduce unwanted reflections |
| Focus adjustment system | Compensates for refractive errors and sharpens images |
| Digital image sensor | Converts optical information into digital images |
| Fixation target | Helps patients maintain the correct gaze |
| Imaging software | Displays, processes, and manages retinal photographs |
Why Does Optical Design Matter?
A high-resolution sensor alone cannot guarantee a clear retinal image.
The quality of fundus photography also depends on optical alignment, illumination uniformity, focus accuracy, pupil size, and the transparency of the eye’s optical media.
For example, cataracts or corneal opacity may reduce the amount of light reaching the retina or returning to the camera.
Therefore, buyers should evaluate the complete imaging system rather than comparing sensor resolution alone.
How Is a Fundus Photograph Taken?
The examination is generally straightforward and non-invasive. However, proper positioning and alignment make a noticeable difference to the final image.
Step 1: Patient Positioning
The patient sits in front of the fundus camera and places their chin and forehead against the supports.
The operator adjusts the instrument to align with the eye being examined.
Step 2: Focus and Alignment
The patient looks at an internal or external fixation target.
The operator adjusts the camera until the pupil and retinal structures are properly aligned and focused.
Step 3: Retinal Photography
Once the image is clear, the camera captures the retina using a flash or another imaging illumination method.
Non-mydriatic systems can often capture images without pharmacologically dilating the pupil.
Step 4: Image Review and Storage
The digital image appears on the connected display or computer.
The operator checks image clarity, positioning, and retinal coverage before saving the examination.
According to a practical review published in BMJ Practical Neurology, infrared illumination can support focusing in non-mydriatic fundus photography because it does not stimulate pupillary constriction in the same way as visible light. A flash is still required for the final photographic image.
What Are the Different Types of Fundus Cameras?
Not every retinal camera is designed for the same clinical environment. The appropriate choice depends on patient volume, examination requirements, available space, and portability needs.
1. Mydriatic Fundus Camera
A mydriatic fundus camera requires pupil dilation using ophthalmic eye drops before photography.
Its advantages include:
- Better access to the retina in patients with small pupils.
- More flexibility when examining difficult cases.
- Suitability for detailed retinal documentation.
However, dilation takes additional time and may cause temporary blurred near vision and light sensitivity.
2. Non-Mydriatic Fundus Camera
A non-mydriatic fundus camera is designed to capture retinal images without routinely requiring pupil-dilating drops.
It is commonly used in eye clinics and diabetic retinal screening programs.
Key benefits include:
- More convenient patient examinations.
- Shorter preparation time.
- Better suitability for routine screening workflows.
- Reduced dependence on pharmacological dilation.
Nevertheless, small pupils, cataracts, and poor fixation can still affect image quality.
3. Portable and Handheld Fundus Camera
Portable fundus cameras are designed for locations where traditional tabletop equipment may be inconvenient.
They are particularly useful for:
- Community eye screening.
- Mobile medical services.
- Bedside examinations.
- Primary care facilities.
- Remote healthcare settings.
For clinics with limited examination space, handheld retinal imaging equipment can offer greater flexibility.
What Specifications Matter When Choosing a Fundus Camera?
For ophthalmologists, distributors, and medical equipment procurement teams, understanding technical specifications is essential before purchasing.
Here are five important parameters to compare.
| Specification | Why It Matters |
|---|---|
| Field of view (FOV) | Determines how much of the retina can be captured |
| Image resolution | Affects the detail available in digital photographs |
| Minimum pupil size | Indicates the smallest pupil the device is designed to accommodate |
| Diopter compensation | Determines the refractive error range the system can compensate for |
| Imaging modes | Determines whether the camera supports color, red-free, or angiographic imaging |
A Practical Example: LINK M-TECH LK-650 Digital Retinal Camera
The LINK M-TECH LK-650 Digital Retinal Camera provides a useful example of how these specifications translate into practical equipment selection.
According to its published manufacturer specifications:
- Field of view: Up to 45°.
- Color image resolution: 5184 × 3456 pixels.
- Minimum pupil size: 3.3 mm.
- Diopter compensation: -25D to +30D.
- Working distance: 46 mm.
- Imaging options: Non-mydriatic photography, with FFA functionality available on the LK-650B model.
The LK-650A and LK-650B serve different imaging requirements. Buyers should confirm the exact configuration before ordering.
These specifications are particularly relevant when comparing retinal cameras for hospitals, ophthalmology clinics, and international distribution.
What Diseases Can a Fundus Camera Help Detect?
Fundus photography provides visual documentation that supports the assessment and monitoring of several retinal and optic nerve conditions.
Common clinical applications include:
- Diabetic retinopathy: Identifying visible retinal hemorrhages, microaneurysms, and other changes.
- Hypertensive retinopathy: Documenting retinal vascular changes associated with high blood pressure.
- Age-related macular degeneration (AMD): Recording visible macular abnormalities.
- Glaucoma: Documenting optic disc appearance and supporting longitudinal assessment.
- Retinal vascular disorders: Recording visible changes in retinal blood vessels.
It is important to understand that a fundus photograph does not independently confirm every eye disease. Some conditions require additional examinations, such as OCT, fluorescein angiography, visual field testing, or a comprehensive dilated eye examination.
Fundus Camera vs. OCT: What Is the Difference?
Both instruments are important in modern ophthalmology, but they provide different types of information.
| Comparison | Fundus Camera | OCT Machine |
|---|---|---|
| Imaging method | Retinal photography | Optical coherence tomography |
| Image type | Two-dimensional retinal image | Cross-sectional retinal image |
| Main purpose | Document retinal appearance | Examine retinal layers and structures |
| Blood vessels | Visible in color images | Can be assessed with specialized OCT angiography |
| Common applications | Screening and retinal documentation | Macular and optic nerve structural assessment |
In practice, these instruments complement each other. A fundus camera provides an overall photographic record, while OCT offers detailed structural information.
For hospitals and larger eye clinics, having both technologies can support a more comprehensive diagnostic workflow.
How to Choose the Right Fundus Camera for Your Clinic
The best fundus camera is not necessarily the one with the highest resolution or the most advanced software. It is the one that matches your clinical requirements and operating conditions.
Before purchasing, consider:
- Clinical application: Routine screening, retinal documentation, or more specialized examinations?
- Patient volume: Will the equipment be used occasionally or throughout the working day?
- Pupil requirements: Is non-mydriatic imaging important for your patient population?
- Software compatibility: Does the system support image management, reporting, and required DICOM or HIS/PACS integration?
- Supplier support: Are installation guidance, technical assistance, spare parts, and warranty services available?
For distributors, it is also worth checking product configuration, regulatory documentation, customization options, and long-term supply arrangements.
LINK M-TECH offers a range of ophthalmic diagnostic equipment, including retinal cameras, OCT machines, tonometers, and slit lamps. The company supports international distributors, hospitals, and eye clinics with equipment supply and OEM/ODM services.
Conclusion:
A fundus camera works by combining controlled illumination, precision optics, and digital imaging to capture detailed photographs of the retina. Its value lies not simply in producing high-resolution pictures, but in helping eye care professionals document retinal conditions and monitor changes over time.
For hospitals, eye clinics, and medical equipment distributors looking for a versatile retinal imaging solution, the LINK M-TECH LK-650 is worth considering. Its 45° field of view, 5184 × 3456 color resolution, and two available configurations provide a useful starting point for comparing clinical requirements and purchasing options.
Hi, this is a comment.
To get started with moderating, editing, and deleting comments, please visit the Comments screen in the dashboard.
Commenter avatars come from Gravatar.